
Our 2nd Dinosaur Quilt Pattern: Ankylosaurus
This gorgeous gal continues our series. Our first go at the pattern is using the “fast” technique — traditional piecing using freezer paper. You’ll print out the 4 quadrants onto freezer paper. CLICK HERE or the button below to purchase the individual pattern. You can also purchase all 6 as a set when you CLICK HERE. This week I introduce you to the “fast piecing” technique: freezer paper piecing. This is the technique I’ve used for over 25 years to create my giant gem quilts.
I’ve created several short instructional videos demonstrating the following:
- Supplies
- Cutting Apart the Freezer Paper Pattern
- Ironing the Freezer Paper To the Fabric
- Cutting Your Fabric Pieces
Enjoy the adventure!
Video #1: Supplies
Annette provides a full list of supplies to make this handsome guy on page 2 of the pattern. This video provides an overview of my favorite tools, where to source them, and how to use them. Note: This is the Supplies video from Mr. T-Rex from Week #1. However, you’re not missing a thing. Everything in this overview of supplies is what you’ll need for your Ankylosaurus pattern.
Video #2: Understanding the Codes & Cutting Apart The Freezer Paper Pattern
Here’s a good look at the codes that are on every single piece of the pattern. They’re just visual clues to help you piece them back together! Once you understand what the letters and numerals mean, you’ve got the key to piecing Ms. Ankylosaurus with confidence.
Also, the key to cutting apart your dinosaur quilt pattern is using a rotary cutter and a ruler for consistently straight and even edges on your freezer paper pieces. But if you happen to slip off the seam line with your rotary cutter, no problem! Leave it alone and don’t trim it up.
Video #3: Ironing the Freezer Paper to Fabric
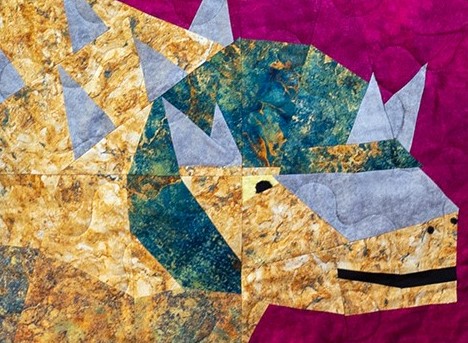
Let’s play with all that delicious fabric you have selected for your dino! The Ankylosaurus pattern has 1 additional fabric that T-Rex did not have: the “LS” or Light Skin fabric. The image below shows how I used the blue Northcott Stonehenge ombre to create another value in this grouping of fabrics.

Then let’s start ironing our pieces onto our fabric. In this short video, I share some tips about how to ensure success when ironing your freezer paper to the RIGHT side of the fabric. The key is to pay attention to the spacing between your pieces and supporting the longest edges by placing them on the straight of grain. The pieces for Ms. Ankylosaurus aren’t particularly long and in need of straight-of-grain support, so don’t worry too much about placing every single piece parallel to the selvedge. You might want to place just the longest sides of the biggest pieces. All the others, “fu-get about it”!
Note: This is the same video used in Week #1, but it provides all the same concepts you’ll use for your gorgeous Ankylosaurus.
Video #4: Cutting Pieces From Your Fabric
Using your favorite ruler with a quarter-inch measurement and a rotary cutter, slice out your pieces with a quarter-inch seam allowance around every edge. Take your time to ensure accuracy. You’ll be glad you did when you get to the next step.
Note: This is the same video used in Week #1, but it provides all the same concepts you’ll use for your gorgeous Ankylosaurus.
A Peek at the Piece Plan for Ankylosaurus &
Video #5: Assembling Your Pieces
Once you have your fabric pieces laid out in your “piece plan”, you’re ready to sew. (See how I’ve laid out my pieces into a “Piece Plan” in the image below.) The freezer paper pieces will be on the INSIDE of the fabric sandwich. As such, you’ll ever-so-slightly adjust your pair of facets to the left of the quarter-inch seam guide on your throat plate, thereby moving the needle slightly off the freezer paper line. But if you end up with gaps or tucks, no big deal, there are ways to fix that!
Note: While the piece plan layout is for the Ankylosaurus pattern, the video is the same as Week #1. No worries, though — all the concepts are exactly the same!

I’ll Be Sewing Ms. Ankylosaurus in Texas!
As you’re reading this (if it’s the week of July 12, 2021), I’ll be sewing sweet Anky in Texas while I teach at 3 different guilds. I’ll be sure to post progress pictures along the way to this blog. (I’ll also be hand-piecing sweet Mr. T-Rex, too, using the “slow” piecing method (English Paper Piecing). Meanwhile, have a wonderful time piecing your next dino block together. Shine on!
Video #6: Adding Eye & Nostril
Ms. Ankyulosaurus isn’t showing her pearly whites like Mr. T-Rex does, but she does need an eyeball and 2 little nostrils. You can use the Heat & Bond product that was used to create T-Rex’s teeth and eyeball last in Week #1. In this short video I’ll show you how I used Heat & Bong Lite to add T-Rex’s teeth and an eyeball — the exact same product and technique you’ll use for Ankylosaurus.